Development in WordPress technology offers convenience. It is an open source technology, so you can easily see the structure of the files. When you are using WordPress, it is suggested that you customize your file and directory structure, so that your developed solution with WordPress stays protected.
Generally, most WordPress web developers prefer rearranging the core WordPress file structure. In this article, we shall cover how you can do that with the minimal steps.
Let us get started!
First Step: Back it Up
When you are using any method to customize the structure, there are all the chances that it may break your website if you are not careful. So make sure that you have created a backup. It is always good to do that for any kind of tricky development tasks and not take chances. To backup your website, take help from web development experts. During this process, make sure that any error messages don’t show up on the front end with any sensitive messages by turning on error logging.
When you are reorganizing your WordPress file structure, your website goes offline for that time being. So it is important that you set up a temporary redirect (302). This will not hinder your visitor while your site is under this process and will not hamper the optimization on the search engines at all.
See Also :- How Hackers Gain Access To Your WordPress Websites
Second Step: Changing your File Directory
When you go about changing your file directory, you are basically moving only two files from your website to a separate directory. This way, you become more organized. This would require creation of new URL which is similar to your website name for the core files. But in this method, you can still keep the website name unchanged while moving those files to that URL i.e. the directory.
The catch is that the core files are generally located in the root of your WordPress install, so the hackers also go looking for it over there. When you create a new file directory for the core files, you can protect your files and use them easily whenever you wish.
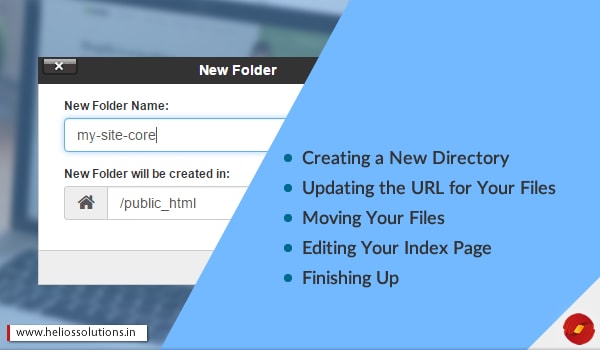
Third Step: Create New Directory
When you are creating a new directory in your website, you need to start by using a tool like SSH and the command line, FTP with a program like FileZilla. You can also choose to do the same through the control panel’s file manager.
cPanel> Files> File Manager> Log In
Look for your website core files in the root of the site.
Root > Folder> Enter New Name for New Directory ( Top of the page)
Name it Wisely
While you create a new directory, you need to consider keeping a name which the hackers cannot guess. Just make sure that you don’t select something like “WP-Corefiles or “WPFileStructure”. After you create the new structure in the new folder, you will get to see the list of other files created. Just be sure that you update your WordPress website address so that when you move the files the site will locate the core file location.
Fourth Step: Update the URLs
When you have made changes in the single install site, next step is to update the URL by logging in your WordPress site.
Settings> General Settings – in your admin dashboard
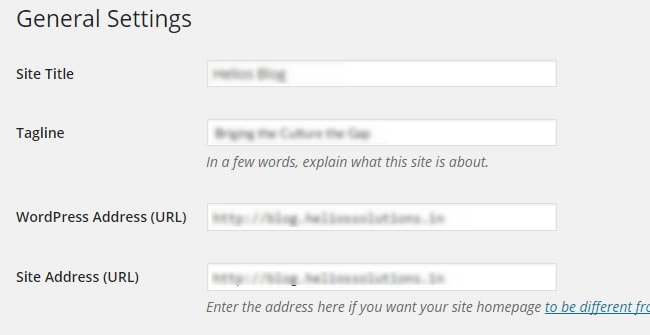
You can add a slash to the end of the sites address in the (URL) field which is followed by directory you created. Don’t forget to save the changes in the end once you are done updating the URLs.
For a multi-site network
In this case, you cannot update the URLs directly from the super admin dashboard. This needs to be done to the config files. For this reason, the WordPress development expert will need to write code in the wp-config.php file. You can do this for the single install too.
Goto wp-config.php file and add the text over there.
You have to be careful while naming the folder again. Ensure that you have changed the name “application” to the name of the folder you have created in the wp-config. If you do have the SSL certificate for your website, then you need to change the website URL address to http instead of https. To get the SSL certificate, talk to our web development specialists now.
Do save your changes and move your core files easily!
Fifth Step: Move Core Files
This is the last and the easy step but this is only after you have updated the URLs. You can do this by simply going to the file manager and the root of your website which is in the cPanel.
cPanel>File Manager >Root> Select files & Folder> Drag & Drop to new directory
When you reach the files and folder, as soon as you select, the selected files and folder will be highlighted and then you can easily move them to the new directory that you just created. As simple as it sounds!
And It’s Done!
Well, we hope these steps have helped you create new directory for your wordpress site. If you belong to a non–technical background and have difficulty in configuring this in the core of the files, then let us know, we will be happy to help you. Our team of WordPress developers ensures protection of your code and core files of your WordPress site. Let’s make web browsing protected!